
If you’re in the mood to indulge yourself with Costa Rica in mind, consider making a coconut flan. It’s light, sweet and easy to prepare. Until we can get back to normal activity, you can travel behind your stoves… Ingredients :
- White sugar (1+1/2 cup)
- Eggs (6 or 7, depending on size)
- Vanilla (1 teaspoon)
- 1% or 2% milk (1/2 cup)
- Evaporated milk (1 can)
- Sweetened condensed milk (1 can, approx. 300 ml)
- Unsweetened grated coconut (2/3 cup)
Equipment:
- Small cooking pot; ideally with a lid
- Baking dish (round pan if possible); ideally a glass dish
- Blender
- Spatula (optional)
- Large mixing bowl (optional)
Part 1: The caramel for the coconut flan crust
Step 1: Making the caramel
Melt the sugar to create the caramel. Before you start preparing the dough for the flan base, set your oven to preheat to 180 degrees. Separate the sugar into 1-cup and 1/2-cup portions. Pour the 1-cup portion of sugar into the pan. Set aside the 1/2-cup portion for later use. Place saucepan over medium-high heat. If you have a lid, place it over the pan to contain the heat and help the sugar melt from all angles. Every 10 seconds, lift the pan from the burner (remove the lid, if fitted) and stir the pan to move the sugar around the pan. The purpose of this step is to ensure that the granules at the bottom of the pot don’t burn. DO NOT stir the sugar with a utensil. Continue the above step for as long as necessary (usually 5 or 6 minutes), firstly to give the sugar time to melt in the pot, and secondly to give the sugar time to move away from any heat (when lifted from the stove burner) to avoid burning. Be patient; for the first minute or so it will seem like nothing is happening, but throughout the melting process and as you continue to stir the pot, you may see the sugar form lumps. Don’t worry about the clumps, as they’ll eventually melt if you keep heating and stirring the pot. Remove the pot from the stove burner for good when all the sugar has melted and the liquid is a deep orange color. It should resemble transparent caramel.
Step 2: use caramel to create the flan’s base layer
Complete the next step IMMEDIATELY after following the steps described immediately above. If you wait more than a minute after completing the steps described above (i.e. after permanently removing the pan from the stove burner when all the sugar has melted), the caramel will begin to cool/harden and it will be too late to use it. Very carefully (the caramel will be very hot!), pour the caramel directly from the pot into the bottom of the baking dish. Use a spatula to scrape all the caramel from the pan. Do not use the spatula (or any other utensil) to spread the caramel in the baking dish, as this will cause the caramel to clump together. To ensure that the caramel spreads evenly across the bottom of the baking dish, tilt the dish so that the caramel flows wherever you need it. Note that caramel dries in about 1 minute, so you need to work quickly to get the contents out of the pot, into the dish and spread evenly. Note also that you don’t need to pre-grease the baking dish. Please note that the bottom of the baking dish will be very hot, so place it in the fridge. Although this step is not necessary, I find that chilling the baking dish in the fridge for five or ten minutes (while I create the coconut custard mixture as described in the next step) ensures that the caramel base is completely cooled/hardened by the time the coconut custard mixture is added to it.
Part 2: The Coconut flan
Step 3: Prepare the flan mixture
Combine the eggs, vanilla, milk, evaporated milk, condensed milk, remaining sugar and coconut in a blender and blend for 3 minutes. When completely blended, the mixture should be liquid and milk-like, but slightly yellow in color. The mixture will also be frothy at the top (thanks to the eggs) and heavier at the bottom (the result of the sinking coconut). If you don’t have a mixer, you can also mix the ingredients by hand in a bowl.
Step 4: Apply the coconut custard mixture to the caramel base
You’re almost there! Take the baking dish out of the fridge. You may notice that the caramel is cracking all over (or that you hear slight cracks when you handle the dish), but this is not a problem. These cracks are due to temperature changes and do not affect the taste of the dessert. The caramel will even out again when it melts in the oven. Pour the entire contents of the coconut custard mixture into the baking dish over the caramel base. Note that it’s normal for the mixture to pour slowly at first and appear thick at the end, thanks to the coconut at the bottom of the mixer. Make sure you pour the entire mixture into the baking dish, including any remaining coconut pieces. If you strain the mixture to remove the coconut pieces, you’ll also be removing much of the dessert’s desirable flavor.
Step 5: Bake the flan
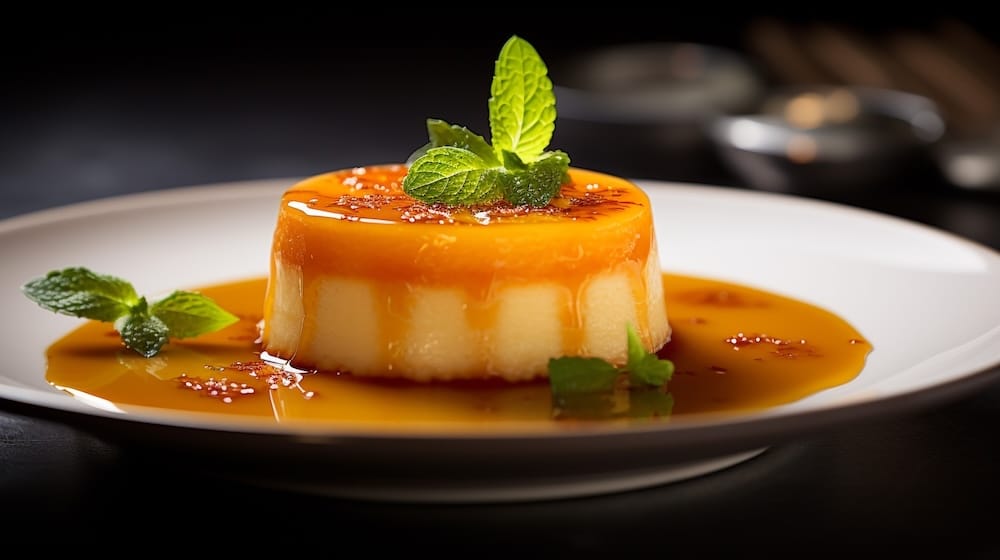
Before starting to bake the flan, make sure your oven has reached 180 degrees. Place the baking dish on the middle oven rack. Set the oven timer to bake the flan for 45 minutes. Once the flan has baked for 45 minutes, turn off the oven. Leave the flan inside the oven for a further 15 minutes, then remove it and allow it to cool completely. The visible top of the flan (which is actually the underside of the flan, since flan is traditionally served upside down) will look like a cake. There will also be a few cracks in the dessert, allowing you to see the smooth, gelatinous heart of the dessert. Inside, the coconut flan should appear well-formed and opaque, not runny, soft or pale. When cooled (or even chilled, if placed in the fridge), serve the flan directly from the baking dish, one slice at a time. Once a piece of flan has been removed from the dish, use a spoon to scoop some of the melted caramel from the bottom of the dish and drizzle it over the top of the slice. Bon appétit and, above all, Pura Vida!
Découvrez d’autres articles de blog


Pourquoi voyager avec nous ?
Une réputation sans faille depuis 2008
Un seul interlocuteur en français
Notre présence toute l’année sur le terrain
Notre expertise pour une offre sur mesure